မဂၤလာပါေမာင္ခိုင္ထူးဘေလာ့ကိုလာလည္ေသာမိတ္ေဆြအေပါင္းေပ်ာ္႐ႊင္ခ်မ္းေႁမ႔ၾကပါေစ

This is default featured post 1 title

Go to Blogger edit html and find these sentences.Now replace these sentences with your own descriptions.This theme is Bloggerized by Lasantha Bandara - Premiumbloggertemplates.com.

This is default featured post 2 title

Go to Blogger edit html and find these sentences.Now replace these sentences with your own descriptions.This theme is Bloggerized by Lasantha Bandara - Premiumbloggertemplates.com.

This is default featured post 3 title

Go to Blogger edit html and find these sentences.Now replace these sentences with your own descriptions.This theme is Bloggerized by Lasantha Bandara - Premiumbloggertemplates.com.

This is default featured post 4 title

Go to Blogger edit html and find these sentences.Now replace these sentences with your own descriptions.This theme is Bloggerized by Lasantha Bandara - Premiumbloggertemplates.com.

This is default featured post 5 title

Go to Blogger edit html and find these sentences.Now replace these sentences with your own descriptions.This theme is Bloggerized by Lasantha Bandara - Premiumbloggertemplates.com.

วันพุธที่ 3 ธันวาคม พ.ศ. 2557

ဖုန္းကလစ္သူနဲ႔ Service သမားအတြက္ SuperSU v2.37 Apk

 SuperSU v2.37 Apk
1 ရက္ေန႔ထြက္ထားတဲ့ Official ရဲ့ SuperSu ေလးကုိ
အားလံုးအတြက္တင္ေပးလိုက္ပါတယ္။
ဒီေဆာ့၀ဲေလးကိုေတာ့ အားလံုးသိၾကမွာပါ
အထူးမိတ္ဆက္မေနေတာ့ပါ၊ ဖုန္းကလစ္သူနဲ႔
ဖုန္း Service သမားေဘာ္ဒါေတြကေတာ့
အထူးေဆာင္ထားသင့္တဲ့ ေဆာ့၀ဲေကာင္းေလးပါ၊
 Download Here

OR

Download Here 

OR

Download Here 

အဆင္ေျပပါေစ

ဇူးနစ္(နည္းပညာ)


**  Step-1.ေအာက္က Download Button ကိုႏွိပ္လိုက္ပါ

**  Step-2. "5sec". ေလာက္ေစာင္႕ေပးပါ။

**  Step-3. "  << SKIP AD >>   ".ကိုႏွိပ္ေပးပါ။

**  Step-4. Download Link က်လာပါလိမ္႕မယ္။

**  အဆင္ေျပပါေစဗ်ာ။

   Download

วันอังคารที่ 2 ธันวาคม พ.ศ. 2557

Facebook v22.0.0.1.13 Apk

Facebook v22 ေလးကိုတင္ေပးလိုက္ပါတယ္။Update အသစ္ေလးေတြေနာက္ထပ္လန္းလန္းေလး
ေတြပါလာပါတယ္။လိုအပ္ရင္ေအာက္မွာဆြဲလိုက္ပါ။26MB ပဲရွိပါတယ္။ဒီေကာင္ေလဘးကေတာ့
ျမန္ဆန္မႈရွိျပီး  feedback ျပႆ     နာေတြလည္းကင္းပါတယ္။group ဖြဲ႔ျပီး Text, chat ေတြလည္း
ျပဳလုပ္ႏိုင္ပါတယ္။ 


What’s New Facebook v22.0.0.1.13 Apk:
• Improvements for reliability and speed
Keeping up with friends is faster than ever.
• See what friends are up to
• Share updates, photos and videos
• Get notified when friends like and comment on your posts
• Text, chat and have group conversations
• Play games and use your favorite apps
Now you can get early access to the next version of Facebook for Android by becoming a beta tester. Learn how to sign up, give feedback and leave the program in our Help Center: http://on.fb.me/133NwuP
Problems downloading or installing the app? See http://bit.ly/GPDownload1
Still need help? Please tell us more about the issue. http://bit.ly/invalidpackage
Facebook is only available for users age 13 and over.
Terms of Service: http://m.facebook.com/terms.php.


★★နည္းပညာၿမိဳ႕ေတာ္★★

TaiG Jailbreak Tool (v 1.0.1) for iOS 8.1.1

 TaiG-iOS-8.1.1-Jailbreak
IMG_2171 IMG_2178
ဒီ တစ္ခါ iOS 8.1.1 ကို Jailberak လုပ္ႏိုင္မယ့္ TaiG Jailbreak Tool ေလးနဲ့
မိတ္ဆက္ေပးပါမယ့္ Pangu ဟာ ios 8.1 ေနာက္ 8.1.1 ကို Support မေပးႏိုင္ေအာင္ Apple မွJailbreak
ယိုေပါက္မ်ားကို  ပိတ္ထားေသာေၾကာင့္  8.1.1 User မ်ား ကသိကေအာက္ျဖစ္က်ရပါတယ္
အခုေတာ့ iOS 8.1.1 အျပင္ 8.2 beta ကိုပါ Jail ႏိုင္တဲ့
TaiG Tool ထြက္ရွိလာပါျပီ
Download TaiG Jailbreak Tool v 1.0.1 for iOS 8.1.1 & 8.2 beta
download-button-large
Jailbreak ျပဳလုပ္နည္း
ပထမဦးစြာ ဖုန္းႏွင့္ Computer ကိုခ်ိတ္ပါ  itune သိပါေစ
Computer မွ သိလွ်င္ Jailbreak Tool ကိုဖြင့္ျပီး အစဥ္လိုက္တိုင္းျပဳလုပ္ေပးပါ

Tool မွ အလိုအေလ်ာက္ Jailbreak ျပဳလုပ္ေပးသြားမွာျဖစ္ပါတယ္
IMG_2171
IMG_2172
IMG_2173
IMG_2174
IMG_2175
IMG_2176
IMG_2177
IMG_2179
အဆင္ေျပၾကပါေစ
Aung Khaing (MMAS &MMUG)
http://www.myanmarmobileapp.com/

ဘက္စံုသံုး Android Tool ျဖစ္တဲ့ Shume v 3.0.6


Shume ဆို မသိသူမရွိေအာင္ အသံုး၀င္တဲ့ Tool ေကာင္းေလးပါ
အဆိုပါ Tool ေလးကေန Lock က်တာေတြျဖည္ႏိုင္တယ္
Sony , HTC ေတြ အတြက္ one click နဲ႕ Bootloader unlock ျဖည္ႏိုင္တယ္
Factory reset ခ်ႏိုင္တယ္ အစရွိသျဖင့္ အသံုး၀င္ Feature ေတာ္ေတာ္မ်ားမ်ား ပါ၀င္ပါတယ္
ဒါ့ အျပင္ မိမိ ဖုန္း အမ်ိဴး အစားနဲ့ ကိုက္ညီမယ့္ Custom ROM အမ်ိဳး အစားေတြကို
ရယူႏိုင္ပါေသးတယ္ ယခု version မွာေတာ့ UI နည္းနည္း ေျပာင္းသြားတယ္
ကဲ ေျပာေနတာ နည္းနည္းမ်ားသြားတယ္
ေအာက္မွာ ရယူလိုက္ဦးေနာ္
Shume 3.0.6 ကို ရယူရန္
Aung Khaing (MMAS)
http://www.myanmarmobileapp.com/


Mozila ရဲ႕အသုံး၀င္ပုံ Keyboard မ်ား


Ctrl+N - It use for Open New Browser Window.

Ctrl+T - It use for Open New Tab on Existing window.

Ctrl+W or Ctrl+F4 - It use for Close the current window or Tab.

Ctrl+R or F5 - For refresh The Page

Ctrl+F5 orCtrl+Shift+R - Refresh the page with override cache

How To Backup & Restore Your Pc ( ကြန္ပ်ဴတာမွာဘက္အပ္လုပ္ယူနည္း & ျပန္သြင္းနည္း)

 မဂၤလာပါ ကြ်န္ေတာ္ ကြန္ပ်ဴတာမွာ ဘက္အပ္ လုပ္ေဆာင္ျခင္း က႑ကို အရွင္းလင္းဆံုး၊ နားလည္နိုင္ဆံုး ျဖစ္ေစရန္အတြက္ အေသးစိတ္တစ္ဆင့္ခ်င္းကို   ပုံေလးေတြနဲ႕ တကြ ရွင္းလင္းေဖၚျပေပးထားတာပါ။

ကဲစလိုက္ၾကရေအာင္ back up ဘာလို ့လုပ္ရသလဲဆိုတာကို အရင္ သိသေလာက္ေျပာျပပါ့မယ္ေနာ္....
ကြန္ပ်ဴတာေတြရဲ႕ ဝင္းဒိုးျပႆနာေတြ ခဏခဏတက္ေနတဲ့အတြက္ အစကေနျပန္ျပန္ျပီး Windows မတင္ခ်င္တာရယ္၊ ကိုယ္ထည့္သြင့္ထားတဲ့ program ေတြကို Windows ေၾကာင့္၊ virus ေၾကာင့္၊ အျခားျပႆနာ တစ္ခုခုေၾကာင့္ ျဖစ္ေစ မပ်က္ဆီး မဆံုးရံႈးခင္မွာ back up လုပ္ထားလိုက္ရင္ Windows ျပန္တင္စရာမလိုဘဲ အဲဒီ back up Image ဖိုင္ကို ျပန္ထည့္လိုက္တာနဲ႔ Windows လည္း တင္ၿပီးသား ျဖစ္သလို  Software ေတြလည္း တင္ၿပီးသား ျဖစ္သြားေအာင္ ျပဳလုပ္ျခင္းျဖစ္ပါတယ္။ တကယ္ေတာ့  Windows Partition အပိုင္းတစ္ခုလံုးကို Image file အျဖစ္ copy ကူးယူလိုက္ျခင္းျဖစ္ပါတယ္...ဒါေလးကို ကြ်န္ေတာ္ စတင္လုပ္ခဲ့စဥ္က  ေနမင္းေမာင္  ဆုိဒ္မွာ ေတြ႕ျပီး ေလ့လာလုပ္ေဆာင္ခဲ့ဘူးပါတယ္...

သိထားရမွာကေတာ့   back up လုပ္တယ္ဆိုတာ ဝင္းဒိုးတင္ျပီး အေရးၾကီးလိုအပ္တဲ့ Program ေတြ၊ Driver ေတြ ထည့္ျပီးတဲ့ အခ်ိန္ မွာ လုပ္ထား တာပိုေကာင္းပါမယ္ေနာ္...အခ်ိန္ကာလၾကာလာမွ လုပ္ၾကမယ္ဆို  ဝင္းဒိုးထဲမွာလဲ program ေတြမ်ားလာမွာျဖစ္တဲ့အတြက္ ဒီအခ်ိန္ၾကမွ back up လုပ္မယ္ဆိုရင္ အခ်ိန္ အရမ္းၾကာမွာျဖစ္ျပီ Restore ျပန္လုပ္မယ္ဆိုရင္ လဲအခ်ိန္ေတြၾကာေန အံုးမွာျဖစ္ပါတယ္။ ဒါေၾကာင့္ မိတ္ေဆြမ်ားအေနနဲ ့အေပၚမွာ က်ေနာ္ေျပာခဲ့သလို ဝင္းဒိုးတင္ျပီး လိုအပ္တာေတြ ျဖည့္စြပ္ျပီးတဲ့ အခ်ိန္မွာ back up လုပ္ေပးၾကပါ ဒါမွ Windows ျပန္တင္ရတဲ့ ဒုကၡ ၊ program ေတြ ၊ Driver ေတြ ထည့္သြင္း ရတဲ့ ဒုကၡ မွကင္းေဝးမွာျဖစ္ပါတယ္။ အားသာခ်က္အေနနဲ ့ေျပာရမယ္ဆိုရင္ ဝင္းဒိုးတစ္ခုလံုးကို back up မလုပ္ဘဲ မိမိအတြက္ အသံုးဝင္တဲ့  program ကိုဘဲ back up လုပ္နိုင္တာပါ။ မိမိတို ့ back up လုပ္တဲ့အခ်ိန္မ်ားမွာ Data ေတြကိုေရြးခ်ယ္ျပီး back up လုပ္ခြင့္ရွိတာကို ေရြးခ်ယ္ေပးခဲ့မယ္ဆိုရင္ မိမိ back up လုပ္ခ်င္တာကိုဘဲ လုပ္နိုင္မွာျဖစ္ပါတယ္။ restore ျပန္လုပ္မယ္ဆိုရင္လဲ မိမိအသံုးျပဳမယ့္ back up file ကိုဘဲ restore ျပဳလုပ္နိုင္ပါတယ္။
သည္လို နည္းလမ္းေလးေတြကိုလည္း ကြ်န္ေတာ္ကိုယ္တိုင္  စတင္ေလ့လာစဥ္က  မွတ္သားခဲ့ဖူးတာေလးေတြကို  ယခုခ်ိန္ ျပန္လည္ မွ်ေ၀ျခင္းျဖစ္ပါတယ္...
မူပိုင္နည္းပညာေတြ မဟုတ္ေပမယ့္  လက္ဆင့္ကမ္းတဲ့အေနနဲ႕  မွတ္သားထားမိသေလာက္ေတာ့ ျပန္လည္ ေ၀မွ်သြားမွျဖစ္ပါတယ္ေနာ္...
ေလးစားစြာျဖင့္....ဘေလာ့ခရီးသည္


 How To Backup Your Pc

 ပုံႏွင့္တစ္ကြ  ကြ်န္ေတာ္ လုပ္ထားတာေလးေတြကို တဆင့္ျခင္းရွင္းသြားပါ့မယ္ေနာ္..
စဖို႕ရာအတြက္ မိမိတို႕ ကြန္ပ်ဴတာမွ  Contropanel  ကိုသြားလိုက္ပါ

အဆင့္ (၁)          အေနနဲ႕ Backup and  Restore  ဆိုတာကိုကလစ္လိုက္ပါ။


အဆင့္  (၂)             အေနနဲ႕ဆက္လက္ျပီး Set Up Backup  ကိုကလစ္လိုက္ပါ။


အဆင့္ (၃)                အေနနဲ႕ကေတာ့ အပိုင္းေတြ ျမင္ေနရပါမယ္ မိမိတို႕ သိမ္းလိုေသာအပိုင္းကို ေရြးခ်ယ္ေပးရမွာျဖစ္ပါတယ္


အဆင့္  (၄)       အေနနဲ႕ကေတာ့ Let Me Choose  ဆိုတာအမွတ္ေပးကာ ေအာက္က Next ဆိုတာကလစ္ပါ။


အဆင့္  (၅)           အေနနဲ႕ကေတာ့မိမိတို႕ Backup  လု္ပလိုေသာ အပိုင္းေတြ ဖိုင္ေတြ ကိုေရြးခ်ယ္နိဳင္ပါတယ္။


အဆင့္ (၆)           အေနနဲ႕Change schedule ဆိုတာကလစ္ျပီး ဆက္သြားပါ။


အဆင့္  (၇)               အေနနဲ႕ အခ်ိန္ကာလ ေန႕ရက္ေတြ ေရြးခ်ယ္နိဳင္ပါတယ္။


အဆင့္  (၈)          အေနနဲ႕ မိမိတို႕ Backup လုပ္ငန္းစတင္ေနပါျပီ....ေစာင့္ေနလိုက္ပါေနာ္။


အခ်ိန္ အသင့္တင့္ေတာ့ ၾကာပါမည္... ေစာင့္ေနရပါမယ္ေနာ္...ဒါဆို မၾကာခင္မွာ မိမိတို႕  ကြန္ပ်ဴတာမွ Backup  ကိုရရွိမွာျဖစ္ပါတယ္... သည္ေလာက္ဆို  Backup   လုပ္ေဆာင္ျခင္း ကို နားလည္လိမ့္မယ္လို႕ ေမွ်ာ္လင့္ပါတယ္.. BACKUP  လုပ္ေဆာင္ခ်က္ေလးမ်ားကို စာအုပ္အျဖစ္ ေဒါင္းယူလိုပါက.....

How To Backup Your Pc ( PDF-DOWNLAOD)

Restore  လုပ္နည္းကိုလည္း ဆက္လက္ ေရးသား ေပးပါ့မယ္...ေနာ္..


ကြန္ပ်ဴ တာမွာ RESTORE  ျပဳလုပ္နည္း

အဆင့္  ( ၁ )  အေနနဲ႕  မိမိတို႕ ကြန္ပ်ဴတာ နဲ႕ Contropanel ကို၀င္ျပီး Backup and restore  ကို၀င္ပါ။

 
အဆင့္  ( ၂ )        အေနနဲ႕  Recover system setting or your computer   ကို Click ပါ။


 အဆင့္  ( ၃ )         အေနနဲ႕ကေတာ့   Advance recovery method    ကိုေရြးခ်ယ္လုိက္ပါ


အဆင့္  ( ၄ )        အေနနဲ႕ဆက္လက္ျပီး ( Choose Advance recovery method ) တြင္ မိမိသိမ္းထားခဲ့ တဲ့ Back up file မွတစ္ဆင့္ Restore လုပ္မွာျဖစ္တဲ့အတြက္ Use a system image you created earlier to recover your computer ကိုေရြးျပီး Click ေပးလိုက္ပါ။


အဆင့္  ( ၅ )                  ကေတာ့ Restart ဆိုတာကလစ္လိုက္ပါေနာ္.


အဆင့္ ( ၆ )                 မွာဆက္လက္ျပီးေတာ့  Next  ဆိုတာကလစ္ပါ။


အဆင့္  ( ၇ )                     ကေတာ့ ေအာက္ကပုံတိုင္း
back up လုပ္ထားတဲ့ image file တည္ေနရာကို  အလိုအေလ်ာက္ ေဖၚျပေပးပါလိမ့္မယ္။ Next က္ို ဆက္ျပီး Click ပါ။


အဆင့္ ( ၈ )                     မွာက Next ဆိုတာနဲ႕ဆက္သြားလိုက္ပါ။


အဆင့္ ( ၉ )            ကိုူဆက္လက္ၾကည့္လိုက္ပါ  ေအာက္ကတုိင္း Finish  ဆိုတာေပါ့ဗ်ာ..


အဆင့္  ( ၁၀ )                 အေနနဲ႕ လုပ္ေဆာင္ခ်က္ ေနာက္ဆုံး ျဖစ္ပါတယ္ Restore  လုပ္ငန္းစဆင္ေနပါျပီ.. ေစာင့္ေနလုိက္ေပေတာ့ေနာ္...အိုေက


စာအုပ္အျဖစ္ေဒါင္းယူလိုပါက  ေအာက္မွာ  Backup  လုပ္နည္း နဲ႕ Restore လုပ္နည္းဆိုျပီး  ၂ အုပ္ခြဲေရးထားပါတယ္..ေနာ္

ကြန္ပ်ဴ တာ Backup လုပ္နည္း

(or)

ကြန္ပ်ဴတာ Restore လုပ္နည္း

(or)


 က်ေနာ္ေရးေသာ အျခားစာအုပ္မ်ား ေဒါင္းယူလိုပါက    သည္မွာ    ၀င္ေဒါင္းလိုက္ပါေနာ္
ဘေလာ့ခရီးသည္

Zenfone 4 KitKat ကို Root ျပဳလုပ္နည္း


Sari Poage Zenfone4 (T001)4.4.2ေဖါက္နည္းေလး႐ွိရင္ မ,စ ပါအံုးအကိုေရ.....

Zenfone 4 Kitkat ကေတာ့ Root ဖါက္မယ္ဆိုရင္ ကြန္ပ်ဴတာနဲ႔မွ အဆင္ေျပမွာပါ... 

ေအာက္ပါအဆင့္အတိုင္း ျပဳလုပ္ေပးႏိုင္ပါတယ္...
   1. Install  USB driver  Asus Zenfone 4 Your PC/Laptop.
Driver ကို အရင္ Install လုပ္ထားပါ....

USB Debugging  ကို ON ထားဖို႔ လိုအပ္ပါမယ္...

ေအာက္ပါအဆင့္အတိုင္း USB Debugging ကို ON ေပးထားရပါမယ္...

Step 1: Go to Settings.
Step 2: Click About.
Step 3: Open Software information.
Step 4: Tap Build number continuously until a pop-up hint informs you that you’ve entered the developer mode.
Build number) ကို ၅ ၾကိမ္မွ ၇ ၾကမ္ေလာက္ ဆက္တိုက္ တို႔ထိေပးပါ)
 
Step 5: Return to Settings.
Step 6: Find and open Developer options.
Step 7: Select USB debugging and click OK.

ဖုန္းကို Power ပိတ္လိုက္ပါ...

(Power + Vol +) ကို တျပိဳင္ထဲ ႏွိပ္ျပီး   Fastboot mode ကို ဝင္ပါ..

ဖုန္းကို PC နဲ႔ ခ်ိတ္ဆက္ပါ...


   2. Download : file  (Root_V2_Zenfone 4_T001.zip)
 အေပၚက Root Zip ဖိုင္လ္ကိုေဒါင္းျပီး ျဖည္လိုက္ပါ...


အထဲမွာ OPEN.CMD ဆိုတဲ့ .bat ဖိုင္လ္ေလးကို Run လိုက္ပါ...

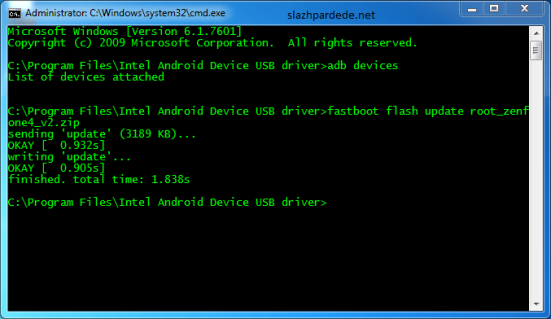
CMD Prompt ထဲကို ေအာက္ပါ အနီေရာင္နဲ႔ Command ကို Copy ကူးျပီး Enter ေခါက္ေပးလိုက္ပါ..

fastboot flash update root_zenfone4_v4.2.0.zip
 
သူ႕ဘာသာသူ အလုပ္ လုပ္ေနပါလိမ့္မယ္

ျပီးတာနဲ႔ ဖုန္းျပန္ပြင့္လာပါမယ္...

Cara Root Zenfone 4 KitKat
 
ျမန္မာစာအတြက္ကေတာ့ MM Aio Font Changer  ေလးနဲ႔ ထည့္ေပးလိုက္ပါ..။

  အဆင္ေျပပါေစ...
www.winkabarkyaw.net

LinkWithin

Related Posts Plugin for WordPress, Blogger...

Share

Twitter Delicious Facebook Digg Stumbleupon Favorites More