မဂၤလာပါေမာင္ခိုင္ထူးဘေလာ့ကိုလာလည္ေသာမိတ္ေဆြအေပါင္းေပ်ာ္႐ႊင္ခ်မ္းေႁမ႔ၾကပါေစ

This is default featured post 1 title

Go to Blogger edit html and find these sentences.Now replace these sentences with your own descriptions.This theme is Bloggerized by Lasantha Bandara - Premiumbloggertemplates.com.

This is default featured post 2 title

Go to Blogger edit html and find these sentences.Now replace these sentences with your own descriptions.This theme is Bloggerized by Lasantha Bandara - Premiumbloggertemplates.com.

This is default featured post 3 title

Go to Blogger edit html and find these sentences.Now replace these sentences with your own descriptions.This theme is Bloggerized by Lasantha Bandara - Premiumbloggertemplates.com.

This is default featured post 4 title

Go to Blogger edit html and find these sentences.Now replace these sentences with your own descriptions.This theme is Bloggerized by Lasantha Bandara - Premiumbloggertemplates.com.

This is default featured post 5 title

Go to Blogger edit html and find these sentences.Now replace these sentences with your own descriptions.This theme is Bloggerized by Lasantha Bandara - Premiumbloggertemplates.com.

แสดงบทความที่มีป้ายกำกับ Root แสดงบทความทั้งหมด

วันพฤหัสบดีที่ 15 ตุลาคม พ.ศ. 2558

Samsung Galaxy J7 ကို Root လုပ်နည်း

Samsung Galaxy J7 ကို Root လုပ်ချင်တဲ့သူတွေအတွက် TWRP recovery နဲ့

Root လုပ်နည်းလေးတင်ပေးလိုက်ပါတယ်။ TWRP လေးကိုကျတော်လဲတော်တော်လေးရှာလိုက်

ရပါတယ်။ တွေ့တဲ့လင့်တွေက အဆင်မပြေပါဘူး။ အခုကျတော်ရှာရင်း အဆင်ပြေတဲ့လင့်လေးကို

တင်ပေးလိုက်ပါတယ်။ အဆင်မပြေမှု့ရှိပါက ပြောပေးပါ။


TWRP recovery Download

Download Here

ODIN Download

Download Here


ROOT Toturial
=========
အရင်ဆုံး ဖုန်းထဲက OEM unlock ဆိုတာကို on ပေးရပါမယ်။

Enable USB Debugging on your device. (Settings > Developer Options > USB Debugging)
You need to enable OEM bootloader unlock in your developer options to install the TWRP recovery !. Go to > ‘Settings’ > ‘Developer Options’ > ‘Turn on OEM unlock’ on.


ပြီးရင်တော့ ကျတော်တို့ TWRP လေးကို Flash ပါမယ်။

ဒေါင်းလို့ရလာတဲ့ Odin ကိုအရင်ဖွင့်လိုက်ပါ။
Odin က PDA ဆိုတဲ့နေရာမှာ TWRP recovery tar ဖိုင်ကိုထည့်လိုက်ပါ။

ပြီးရင် ဖုန်းကို Download mode သွင်းလိုက်ပါ။

Download mode >>> volume down + Home + power

ပြီးရင် volume up တစ်ချက်နှိပ်ပေးလိုက်ပါ။

ဖုန်းမှာ Download mode ဝင်ပြီဆိုရင်တော့ computer နဲ့ ချိတ်ဆက်ပေးလိုက်ပါ။

Odin မှာ ဖုန်းကိုသိပြီဆိုရင် Odin က Start ဆိုတာလေးနှိပ်ပေးလိုက်ပါ။ Odin မှာ PASS ပြပြီး

ဖုန်းမှာ Reboot ကျသွားပါလိမ့်မယ်။ ပါဝါပြန်တက်လာပြီဆိုရင်တော့
TWRP recovery Flash ခြင်းပြီးဆုံးပါပြီ။


Recovery mode ကိုဝင်ပြီး SuperSU-update.zip လေးကို
install ပေးလိုက်ရင်တော့ ROOT အဆင်ပြေပါပြီ။

SuperSU-update.zip မရွိပါက Download ရယူလုိက္ပါ။

 SuperSU-update.zip

Download Here

SuperSU-update.zip အား install ပြုလုပ်နည်း
=========================
၁။ SD card ထဲသို့ SuperSU-update.zip အားထည့်ပါ။
၂။ ဖုန်းကို Recovery mode ဝင်လိုက်ပါ။
၃။ install zip from sd card ကေနျပီး
၄။ SuperSU-update.zip အား install လုပ်ပြီး
Reboot ချပေးလိုက်ပါ။


အဆင်ပြေပါစေ။

Warmly Welcome

Ko Htoo ( MMAS )
ဇူးနစ်(နည်းပညာ)


วันเสาร์ที่ 3 ตุลาคม พ.ศ. 2558

Samsung Galaxy J5 & E5 Root လုပ္မယ္

ခုေနာက္ပိုင္း ေခတ္စားလာတဲ့
Samsung Galaxy J5 & E5 တုိ႕ကို root
လုပ္ႏုိင္ေအာင္ CF Auto Root ကို
တင္ေပးလိုက္ပါတယ္..


1. Download Odin V 3.10.7
    Download

2. Download Samsung Ph Driver    
    USB >>> Download
    Kies >>> Download

3. Download CF Auto Root For-

    ဒီ Model မ်ားအတြက္
    SM-E500F , SM-J500F , SM-J500F/DS , SM-J500FN

   DOWNLOAD

    ဒီ Model မ်ားအတြက္
   SM-E500H , SM-J500H , SM-J500H/DS , SM-J500HN

   DOWNLOAD


အကုန္လုံးစုံပီဆုိရင္ေတာ့ Odin ကို ဖြင့္လုိ္က္ပါ..
PDA မွာ ခုနက ကိုယ္ေဒါင္းထားတဲ့
root ဖိုင္ကို ေရြးေပးလိုက္ပါ.
Samsung Driver မရွိရင္ install အရင္လုပ္ပါ..
ပီးရင္ ဖုန္းကို Download Mode ေခၚပါ.
(Power Up+Home+Power)
ပီးရင္ Computor နဲ႕ႀကိဳးထိုးပါ..
Odin က ID Colum မွာ အေရာင္ေပၚလာတဲ့အထိေစာင့္ပါ
ေပၚလာပီဆိုရင္ start ကိုႏွိပ္ပါ ...
pass ျပတဲ့အထိေစာင့္ပါ ..
Pass ျပပီး Reboot ျပန္လည္သြားမွ Firmware တင္ျခင္းပီးဆုံးပါပီ

အဆင္ေျပပါေစ...
credit by http://www.minokekar.blogspot.com/
    http://www.minokekar.blogspot.com/

วันเสาร์ที่ 28 มีนาคม พ.ศ. 2558

မည္သည့္ဖုန္းကိုမဆို 4.2.2 အထက္ ဖုန္းအားလံုးကို One Click နဲ႔ Root အလြယ္တကူ လုပ္နည္း (ကြန္ပ်ဴ တာမလို)


ျမည္သည့္ဖုန္းကိုမဆို 4.2.2 အထက္ ဖုန္းအားလံုးကို 
One Click နဲ႔ Root အလြယ္တကူ လုပ္နည္း (ကြန္ပ်ဴ တာမလို)
မဂၤလာပါခင္ဗ်ား
ဒီေန႔က်ေနာ္ျပန္လည္မွ်ေ၀ခ်င္တာကေတာ့ အားလံုးအတြက္
 စပါယ္ရွယ္၀မ္းျဖစ္ႏိုင္မယ့္ Android နည္းပညာေလးပါ။
နည္းလမ္းေလးက မခက္ပါဘူးခင္ဗ်ား...။

က်ေနာ္လည္း ကလစ္ရတာကို ၀ါသနာပါသူဆိုေတာ့
အခက္ႀကီးကို ေခါင္းစားမခံခ်င္ပါ အလြယ္ဆံုးနည္းလမ္းေလးကိုပဲ
 မ်က္လံုးေနာက္ေရာက္ေအာင္ လုိက္ရွာတတ္ပါတယ္။

 ကိုယ္တိုင္စမ္းတယ္ အဆင္ေျပၿပီဆိုပါမွ ေဘာ္ဒါေတြအတြက္
 ျပန္လည္မွ်ေ၀ေပးျခင္းျဖစ္ပါေၾကာင္းခင္ဗ်ား...။

 ၁။ ဖုန္းကို Root မလုပ္မွ ဖုန္းရဲ့ Setting > Security >
Unknown Sources ကိုအမွန္ျခစ္ေပးပါၿပီးရင္  OK ကိုႏွိပ္လိုက္ပါ။

Samsung ဖုန္းအမိ် ဳ းအစားလိုက္ အနည္းငယ္ ကြဲျပားေနပါလိမ့္မယ္
ပံုမွန္အားျဖင့္ေတာ့ Samsung Device မွန္ရင္ေတာ့
 Setting > Developer Option > Unknown Sources > OK ဆိုရင္ ရပါၿပီ။


Installation Guide
===========
၁။ ကဲ Root မလုပ္မွီ လိုအပ္တဲ့ Root Apk ေလးကို
ေအာက္ကလင့္ေတြမွာ အရင္ေဒါင္းယူလိုက္ပါ။

towelroot.com

၂။ Root Apk ဆိုက္ကိုေရာက္တဲ့အခါ ေအာက္ကပံုေလးကို
တစ္ခ်က္ေထာက္လိုက္ပါ။

၃။ ေအာက္ကပံုအတိုင္းျပေနခဲ့ရင္ေတာ့
ေဒါင္းေလာ့ရယူဖို႔ရန္ျဖစ္တဲ့အတြက္ OK ကိုႏွိပ္လိုက္ပါ။

တစ္ခ်ိ ဳ ႔ဖုန္းေတြမွာ ေအာက္ကပံုအတိုင္း
ျပမွာမဟုတ္ပါ တစ္ခါတည္း ေဒါင္းေလာ့ေနပါလိမ့္မယ္။


တကယ္လို႔ Root Apk ကိုေဒါင္းေလာ့ရတာ
အဆင္မေျပဘူးဆို

Download Here

OR

Download Here

OR

Download Here

 ၄။ ေဒါင္းေလာ့ၿပီးရင္ေတာ့ ေအာက္ကပံု
အတိုင္း Tr.apk ဆိုၿပီးျပေနပါလိမ့္မယ္။


 ၅။ install လုပ္ဖို႔ရန္အတြက္ ေစာနားက
Tr.apk ေလးကို တစ္ခ်က္ေထာက္ၿပီး
Install လုပ္ပါ ေအာက္ကပံုကို ၾကည့္ပါ။

 
 ၆။ install လုပ္ၿပီးသြားရင္ေတာ့ Open ကိုနွိပ္လိုက္ပါ။


 Rooting Guide
==========
 ၁။ Root လုပ္ဖို႔ရန္အတြက္ Make it Rain ဆိုတာကိုႏွိပ္လိုက္ပါ။


၂။ ေအာက္ကပံုအတိုင္းျပေနခဲ့ရင္ေတာ့
Root လုပ္ဖို႔ရန္အသင့္အေနအထား ျဖစ္ေနပါၿပီ
 Make it Rain ဆိုတာကို ထပ္ႏွိပ္ေပးလိုက္ပါ။


၃။ ေအာက္ကပံုအတိုင္းျပေနခဲ့ရင္ေတာ့
Root လုပ္ျခင္းကိစၥၿပီးပါၿပီ ဖုန္းက သူ႔အလိုလို
 Reboot လုပ္ပါလိမ့္မယ္ ခနေလးေစာင့္ေနလို္က္ပါ။


၄။ Reboot က်ၿပီးလို႔ ျပန္တက္လာတဲ့အခါ
မိမိဖုန္း Root Access ရွိလား မရွိလား သိခ်င္ရင္ေတာ့
Root Checker ေလးနဲ႔ စမ္းသပ္ၾကည့္လိုက္ပါ။

 Root Checker ကို ဖုန္းမွာ အင္စေတာလုပ္ပါ။


Root Checker Official 

 OR

Download Here  

၅။ Root Checker ကို ဖြင့္လိုက္ပါ။
ၿပီးရင္ Verify Root ဆိုတာကို ႏွိပ္လိုက္ပါ။


၆။ Verify Root ေလးႏွိပ္လိုက္ၿပီးရင္ေတာ့
သင့္ရဲ့ႀကိဳ းစားအားထုတ္မႈအားလံုးအတြက္
Congratulations ေပါ့ဗ်ာ Root Access ရရွိသြားပါၿပီ။


အားလံုးပဲ အဆင္ေျပၾကလိမ့္မယ္လို႔
ေမွ်ာ္လင့္ပါတယ္။

အားလံုးကို ခင္မင္ေလးစားလွ်က္


အဆင္ေျပပါေစ
ဇူးနစ္(နည္းပညာ)
                                    www.zunite.org

วันศุกร์ที่ 16 มกราคม พ.ศ. 2558

Lava Iris 500,700,708 အားလံုးကို အလြယ္တကူ Root လုပ္ၿပီးျမန္မာစာမွန္ေအာင္ထည့္နည္း

Lava Iris 500,700,708 အားလံုးကို အလြယ္တကူ Root 
လုပ္ၿပီးျမန္မာစာမွန္ေအာင္ထည့္နည္း
မဂၤလာပါ
ဒီေန႔က်ေနာ္ျပန္လည္မွ်ေ၀ခ်င္တာက Lava Iris ဖုန္းမ်ားနဲ႔
ျမန္မာစာျပသနာေလးပါ။ အခုေနာက္ပိုင္းလူအသံုးမ်ားလာတဲ့
ဒီစမတ္ဖုန္းဟာ ပံုပန္းအားျဖင့္အရမ္းေသသပ္လွၿပီး
အသံုးျပဳရတာ အဆင္ေျပပါတယ္။ က်ေနာ္လည္း ဒီဖုန္းအမိ်ဳးအစားကို
အရမ္းသေဘာက်ပါတယ္ က်စ္လစ္ၿပီး ကိုင္ေဆာင္ရတာလည္း
အဆင္ေျပပါတယ္။ မေျပတာတစ္ခုကေတာ ျမန္မာစာေလးပါ။
ကဲဗ်ာ Lava Iris ဖုန္းမွန္သမွ်ကို အလြယ္တကူ Root လုပ္ၿပီး
ျမန္မာစာမွန္ေအာင္ထည့္နည္းေလးကို အားလံုးအတြက္ တင္ေပးလိုက္ပါတယ္။
Lava Iris 700 ဖုန္းကိုသာ Kingo Root Tool နဲ႔ Root လုပ္ရၿပီး
က်န္တဲ့ Iris 500, 708 စတာေတြကိုေတာ့ Iroot ေနာက္ဆံုးထြက္ေလးနဲ႔ဆို
အကုန္လံုးကို အလြယ္တကူ Root လုပ္ယူႏိုင္ပါၿပီ။
ကဲ lava Iris 700 ေဘာ္ဒါေတြကေတာ့ Kingo Root နဲ႔ ရုန္းလုပ္ၿပီး
ျမန္မာစာထည့္နည္းေလးကို ဒီလင့္မွာ ၀င္ဖတ္ေပးပါ

၁။ ကဲဒီတစ္ခါေတာ့ ပံုမွာျမင္ရတဲ့အတိုင္း မိမိဖုန္းက Lava Iris 708 ရဲ့
အမိ်ဳးအစားမိ်ဳးျဖစ္ေနခဲ့ရင္ေတာ့ Root လုပ္ဖို႔ရန္အတြက္
iRoot ေနာက္ဆံုးထြက္ေလးကို ေဒါင္းေလာ့ယူလိုက္ပါ။

Download Here

၂။  ကြန္ပ်ဴတာနဲ႔ ဖုန္းကို ခ်ိတ္ဆက္ဖို႔ Setting>>>
Developer option>>>USB debugging ကိုအမွန္ျခစ္ထားေပးလိုက္ပါ။ 
 ၃။ ဖုန္းနဲ႔ကြန္ပ်ဴတာကို ခ်ိတ္ဆက္ၿပီးလို႔ ေအာက္ကပံုအတိုင္း
Root လို႔ ေပၚေနခဲ့ရင္ Root ဆိုတာကိုႏွိပ္လိုက္ပါ။


၄။ မိနစ္အနည္းငယ္ၾကာၿပီးတာနဲ႔ ေအာက္ကပံုအတိုင္း
Root Access ေအာင္ျမင္ၿပီးေၾကာင္း ျပေနပါလိမ့္မယ့္
  ၅။ Root checker Apk ကို install လုပ္ၿပီး Root Access ရွိ မရွိ Verified ကိုႏွိပ္ပါ။
Congratulation လို ေပၚေနရင္ မိမိဖုန္း Root ေဖာက္တာ ေအာင္ျမင္သြားပါၿပီ။

Download Here 

OR

Download Here 

၆။ FrozenKeyboard နဲ႔ MM Font installer Djjoe Man.apk ကို install လုပ္ပါ။

(install လုပ္ရန္အတြက္ setting / security /
 unknown source အကြက္ေလးကို အမွန္ျခစ္ေပးပါ)

Click Here to Frozenkeyboard  

OR

Click Here to Frozenkeyboard  

 ၇။ MM Font installer Djjoe Man.apk ေလးကို
ေအာက္လင့္မွာေဒါင္းယူလိုက္ပါ။

Download Here

OR

Download Here

၈။ Apk ေလးကို အင္စေတာလုပ္ၿပီးလို႔ ျမန္မာစေတြနဲ႔
ေဆာ့၀ဲရဲ့လမ္းညႊန္အားလံုးကို ျမင္ေနရရင္ေတာ့
လံုး၀ေသခ်ာသြားပါၿပီ ဒီေဖာင့္ေလးက မိမိဖုန္းအတြက္
အလုပ္လုပ္တယ္ဆိုတာပါ။ Install ဆိုတာကိုႏွိပ္ေပးလိုက္ပါ
ေဖာင့္ထည့္တာေအာင္ျမင္ၿပီးစီးေၾကာင္းျပၿပီး Reboot ခ်ခိုင္းပါလိမ့္မယ့္
Yes ဆိုတာကိုႏွိပ္လို္က္ပါ၊ ျပန္တက္လာတဲ့အခါ မိမိဖုန္း Lava Iris 708
ဖုန္းအားလံုးမွာ ျမန္မာစာလံုး၀မွန္သြားပါၿပီခင္ဗ်ား။

အားလံုးပဲ အဆင္ေျပၾကလိမ့္မယ္လို႔ေမွ်ာ္လင့္ပါတယ္
ဘ၀ရဲ့အေမာေတြေျပႏိုင္ၾကပါေစဟု
ခင္မင္ေလးစားလွ်က္

အဆင္ေျပပါေစ
ဇူးနစ္(နည္းပညာ)
                                               credit by www.zunite.org

วันเสาร์ที่ 13 ธันวาคม พ.ศ. 2557

Samsung ဖုန္းနဲ႔ တက္ဘလက္မ်ားအတြက္ One Click နဲ႔ Root လုပ္ေပးႏိုင္တဲ့ S Root v-1.2 Apk (2.3 to 4.4.2)


  S Root v-1.2 Apk
 မဂၤလာပါ
 နည္းပညာညီအကိုမ်ားနဲ႔ဖုန္းကလစ္သူမ်ား အေမးမ်ား
 ေတာင္းဆိုမႈေတြမ်ားလာတဲ့ Samsung ဖုန္းမ်ားနဲ႔ တက္ဘလက္မ်ားအတြက္ 
One Click Root tool ေလးေတြပါ။
ေအာက္မွာ Developer အာကာရဲ့ မိတ္ဆက္ေလးကို
ဖတ္ၾကည့္လိုက္ပါခင္ဗ်ား။
Samsung ဖုန္ေတြတြက္ Root လုပ္ႏိုင္ပါသည့္။
 Root Apk အမ်ိဳးမ်ိဳးကို လည္ေဒါင္းယူ၍ Root လုပ္ႏိုင္ပါသည္။ 
Computer ကြန္ပ်ဴတာ မလိုဘဲ Samsung ဖုန္
 Model အမ်ိဳးအစားလိုက္ Root လုပ္ႏိုင္ပါသည္
က်န္႐ွိေသးတ့ဲ Samsung Model မ်ားကိုလည္
 ေနာက္ Version အသစ္၌ ထည့္သြင္ေပးသြားပါမည့္။

Download Here 

OR

 Download Here

အားလံုးပဲ စိတ္ႀကိဳက္ကလစ္ႏိုင္ၾကပါေစဗ်ာ

 Credit အာကာ 

วันพุธที่ 3 ธันวาคม พ.ศ. 2557

ဖုန္းကလစ္သူနဲ႔ Service သမားအတြက္ SuperSU v2.37 Apk

 SuperSU v2.37 Apk
1 ရက္ေန႔ထြက္ထားတဲ့ Official ရဲ့ SuperSu ေလးကုိ
အားလံုးအတြက္တင္ေပးလိုက္ပါတယ္။
ဒီေဆာ့၀ဲေလးကိုေတာ့ အားလံုးသိၾကမွာပါ
အထူးမိတ္ဆက္မေနေတာ့ပါ၊ ဖုန္းကလစ္သူနဲ႔
ဖုန္း Service သမားေဘာ္ဒါေတြကေတာ့
အထူးေဆာင္ထားသင့္တဲ့ ေဆာ့၀ဲေကာင္းေလးပါ၊
 Download Here

OR

Download Here 

OR

Download Here 

အဆင္ေျပပါေစ

ဇူးနစ္(နည္းပညာ)


**  Step-1.ေအာက္က Download Button ကိုႏွိပ္လိုက္ပါ

**  Step-2. "5sec". ေလာက္ေစာင္႕ေပးပါ။

**  Step-3. "  << SKIP AD >>   ".ကိုႏွိပ္ေပးပါ။

**  Step-4. Download Link က်လာပါလိမ္႕မယ္။

**  အဆင္ေျပပါေစဗ်ာ။

   Download

วันอังคารที่ 2 ธันวาคม พ.ศ. 2557

Zenfone 4 KitKat ကို Root ျပဳလုပ္နည္း


Sari Poage Zenfone4 (T001)4.4.2ေဖါက္နည္းေလး႐ွိရင္ မ,စ ပါအံုးအကိုေရ.....

Zenfone 4 Kitkat ကေတာ့ Root ဖါက္မယ္ဆိုရင္ ကြန္ပ်ဴတာနဲ႔မွ အဆင္ေျပမွာပါ... 

ေအာက္ပါအဆင့္အတိုင္း ျပဳလုပ္ေပးႏိုင္ပါတယ္...
   1. Install  USB driver  Asus Zenfone 4 Your PC/Laptop.
Driver ကို အရင္ Install လုပ္ထားပါ....

USB Debugging  ကို ON ထားဖို႔ လိုအပ္ပါမယ္...

ေအာက္ပါအဆင့္အတိုင္း USB Debugging ကို ON ေပးထားရပါမယ္...

Step 1: Go to Settings.
Step 2: Click About.
Step 3: Open Software information.
Step 4: Tap Build number continuously until a pop-up hint informs you that you’ve entered the developer mode.
Build number) ကို ၅ ၾကိမ္မွ ၇ ၾကမ္ေလာက္ ဆက္တိုက္ တို႔ထိေပးပါ)
 
Step 5: Return to Settings.
Step 6: Find and open Developer options.
Step 7: Select USB debugging and click OK.

ဖုန္းကို Power ပိတ္လိုက္ပါ...

(Power + Vol +) ကို တျပိဳင္ထဲ ႏွိပ္ျပီး   Fastboot mode ကို ဝင္ပါ..

ဖုန္းကို PC နဲ႔ ခ်ိတ္ဆက္ပါ...


   2. Download : file  (Root_V2_Zenfone 4_T001.zip)
 အေပၚက Root Zip ဖိုင္လ္ကိုေဒါင္းျပီး ျဖည္လိုက္ပါ...


အထဲမွာ OPEN.CMD ဆိုတဲ့ .bat ဖိုင္လ္ေလးကို Run လိုက္ပါ...

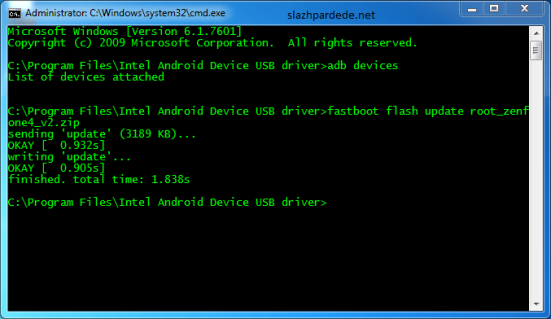
CMD Prompt ထဲကို ေအာက္ပါ အနီေရာင္နဲ႔ Command ကို Copy ကူးျပီး Enter ေခါက္ေပးလိုက္ပါ..

fastboot flash update root_zenfone4_v4.2.0.zip
 
သူ႕ဘာသာသူ အလုပ္ လုပ္ေနပါလိမ့္မယ္

ျပီးတာနဲ႔ ဖုန္းျပန္ပြင့္လာပါမယ္...

Cara Root Zenfone 4 KitKat
 
ျမန္မာစာအတြက္ကေတာ့ MM Aio Font Changer  ေလးနဲ႔ ထည့္ေပးလိုက္ပါ..။

  အဆင္ေျပပါေစ...
www.winkabarkyaw.net

วันพุธที่ 3 กันยายน พ.ศ. 2557

Asus Zenfone 4.5 A450CG ကို Root လုပ္နည္း


ဒီတစ္ခါ ထိုင္းမွာ Asus တံဆိပ္ဖုန္းေတြထဲက လူသံုးမ်ားတဲ့ Asus Zenfone 4.5 ဖုန္းေတြကို Root ေဖာက္ၾကည့္ၾကရေအာင္ Root မေဖာက္ခင္ မိမိကြန္ပ်ဴတာမွာ Asus Usb Driver သြင္းထားရပါမယ္
ကဲ လိုအပ္တဲ့ဖိုင္းေတြ ေအာက္မွာေဒါင္းယူလိုက္ပါ


Driver ဖိုင္းကိုေဒါင္းရန္

Root ဖိုင္းကိုေဒါင္းရန္

ကဲေဒါင္းလို့ရလာတဲ့ Zip ဖိုင္းကို Zip ၿဖည့္လိုက္ပါ
အခု root လုပ္နည္းက Zenfone 4.5 A450CG ေမာ္ဒယ္အတြက္ပါဘဲခင္ဗ်ာ ကဲ root လုပ္ၾကည့္ၾကရေအာင္ ေစာေစာက zip ၿဖည့္ထားတဲ့ဖိုဒါကိုဖြင့္လိုက္ပါ ၿပီရင္ ဖိုဒါထဲက လြတ္တဲ့ေနရာမွာ
မွ်ားေထာက္ၿပီ ကီဘုတ္က Shirt Key ကိုဖိၿပီ ေမာက္စ့္ရဲ့ ညာဘက္ကို ႏွိပ္ေပးလိုက္ပါ ဒီပံုထဲကအတိုင္တက္လာပါမယ္ဒါဆိုရင္


အပံုက မွ်ားၿပထားတဲ့ ေနရာမွာ ႏွိပ္ေပးလိုက္ပါ ဒီလို CMD BOX တက္လာပါမယ္
ဒါလိုတက္လာၿပီဆိုရင္ ဖုန္းကို DroidBoot Mode ေခၚဖို့အတြက္ Power + Vol-Up Key ကိုႏွိပ္ေပးပါ
connect စာတန္တက္လာၿပီဆိုရင္ ဖုန္းကို ကြန္ပ်ဴတာနဲ့ခ်ိတ္ဆက္ေပးလိုက္ပါ ၿပီရင္ ေစာေစာကဖြင့္ထားတဲ့
CMD box ကိုသြားပါ ၿပီရင္ Box အကြက္ထဲမွာေအာက္ကစာတန္ကို copy ကူၿပီ ထည့္ေပးလိုက္ပါ

fastboot flash rootzen450.zip

ၿပီရင္ Enter နွိပ္ေပးလိုက္ၿပီ ေစာင့္ေနပါ ခဏေန CMD အကြက္မွာ ok ဆိုတဲ့ စာတန္တက္လာရင္ ဖုန္းကို reboot ခ်ေပးလိုက္ပါ bootၿပန္တက္လာရင္ Root လုပ္လို့ေအာင္ၿမင္ပါၿပီ

credit by SmartGhost

วันพุธที่ 30 เมษายน พ.ศ. 2557

Samsung Galaxy S5 Root Tools အသစ္

Samsung Galaxy S5 ကို Root ေဖာက္ခ်င္တဲ့သူငယ္ခ်င္းေတြကိုေပးလိုက္ၿပီေနာ္။အထဲမွာ Odin နဲ႔တြဲၿပီးထည္းေပးထားပါတယ္၊USB Debugging on ၿပီး Download Mode နဲ႔ဝင္ရပါမယ္ ၿပီးရင္ Odin ရဲ့ Pda ေနရာမွာ .tar.md5 ဖိုင္ကိုေရြးထည့္ေပးလိုက္ရုံပါပဲ ျမန္မာစာကအဆင္သင့္ပါၿပီးသားဆိုေတာ့ ျမန္မာစာ ျမန္မာကီးဘုတ္ထည့္
သြင္းစရာမလိုပါဘူး။

 Samsung Galaxy S5 Root Tools အသစ္ကိုလိုခ်င္တယ္ဆိုရင္ေအာက္မွာေဒါင္းလိုက္ေနာ္................ 


Samsung Galaxy S5 Root Tools ကို ဒီမွာေဒါင္းပါ

အဆင္ေျပပါေစ........................ 

วันศุกร์ที่ 25 เมษายน พ.ศ. 2557

Android 4.4 ထိ Root ႏိုင္တယ္ဆိုတဲ့ KingRoot For PC version 2.1

KingRoot for PC မွာ အစြမ္းထက္တဲ့ z4root , UniversalAndRoot, GingerBreak , Superoneclick root ေတြနဲ႔ အျခား အစြမ္းထက္ Root Tool ေတြရဲ႕ လုပ္ေဆာင္ခ်က္ေတြကို စုစည္းၿပီး ထုတ္လုပ္ထားတဲ့ Root Tool တစ္ခု ျဖစ္ပါတယ္... PC Version နဲ႔ Android Version apk ဆိုၿပီး ထြက္ပါတယ္.. ခုထြက္လာတဲ့ PC Version 2.1 မွာေတာ့ Pro Version ဆိုရင္ Android 4.4 ထိ Root ႏိုင္တယ္လို႔ ဆိုတားပါတယ္.. ကၽြန္ေတာ္တင္ေပးမွာက Free Version ျဖစ္ၿပီး Pro ကို ဘယ္လိုဝယ္ရလဲေတာ့ မသိပါဘူး.. Free Version အတြက္ စြမ္းေဆာင္ရည္ကိုလည္း ေလွ်ာ့ခ်ထားတာ မရွိဘူးလို႔ ဆိုပါတယ္.. မိတ္ေဆြမ်ား အသံုးလိုရင္ ေဒါင္းႏိုင္ပါၿပီ...


-
Kingroot pc version features

With z4root , UniversalAndRoot, GingerBreak and superoneclick root and other software have more access to the following features:
1, smart phone case to determine the output to meet the requirements of the program, the chances of obtaining permission to significantly enhance the ROOT
2, complete Chinese interface and design fool, suitable for any phase of user
3, versatility, can support more than 2.3 system to obtain root privileges, most of the rest of the most common software only supports 2.2 systems.
4, to support domestic models, such as Huawei U8800, ZTE V880, etc., but does not support the basic foreign software.
5, the feedback problem is not the language barrier, unlike other software, contact the developer must communicate in English, feedback difficult. Users can communicate with the Chinese and developers.

-
Update log

  1 Root significantly enhance the ability to support thousands of models get Root
  2, an upgrade license management, licensing support Android 1.6-4.4
  3, improved stability Root


Download KingRoot for PC 2.1 : 10.1 MB

วันพุธที่ 2 เมษายน พ.ศ. 2557

Samsaung Glaxy S III ရဲ႕ Version-4.3 ေတြကို ျမန္မာစာထည့္နည္း-Root ေဖါက္နည္း


 မဂၤလာပါ ကြ်န္ေတာ္ ခုေရးတာေလးကေတာ့  Android 4.3 ေတြမွာ ျဖစ္ေနတဲ့ ျပသနာေလးကို
က်ေနာ္ ေျဖရွင္းလို႕ရတဲ့နည္းေလးအတိုင္းပါ  ျမန္မာစာေတြ ထည့္မရ root မရျဖစ္တတ္တာေလးကို
သိသလို ေျဖရွင္း မွ်ေ၀လိုက္ျခင္းျဖစ္ပါတယ္ေနာ္...
S3 4.3 ေလးကိုက်ေနာ္ လက္ေတြ႕ စမ္းသတ္ျပီးေတာ့ မွ်ေ၀လိုက္ျခင္းပါ Setting>>font style>>ကေန zawgyi one ခ်ိန္းတဲ့ခါေတြမွာ အေပၚကပုံတိုင္းျဖစ္ေနၾကတာမ်ားတယ္...
ကဲအဲလိုျဖစ္ေနရင္ ရွင္းၾကည့္ရေအာင္ေနာ္

ပထမဆုံး လုိအပ္တာေလးေတြ အရင္ေဒါင္းလိုက္ပါေနာ္

 ဒါက Odin နဲ႕၀င္ ROOT ဖို႕အတြက္ပါ


 OR 

ဒါကေတာ့ Vroot နဲ႕ ROOT ဖို႕ပါ

ျမန္မာစာအတြက္ သုံးရန္

( 0R )

ျမန္မာစာ မမွန္ေသးပါက ေအာက္ကဟာေလးထည့္လိုက္ပါ


        ကီးဘုတ္မ်ားလိုအပ္ပါက        


ကဲ လုပ္နည္းေတြေျပာမယ္ေနာ္... မိမိတို႕ဖုန္းကိုေတာ့ ဘာဘဲျဖစ္ျဖစ္ usb debbugging ဆိုတာေတာ့ ဖြင့္ထားရမွာ ျဖစ္ပါတယ္... နည္းလမ္းကို       သည္မွာ        ၀င္ၾကည့္လိုက္ပါ။

ကြန္ပ်ဴတာမလိုအပ္ဘဲ ဖုန္းမွာ ROOT မယ္ဆိုရင္ေတာ့    သည္မွာ      ေလ့လာုလိက္ပါေနာ္။

 Vroot နဲ႕ လုပ္တာကိုေျပာျပပါ့မယ္  Vroot ဆိုတာကို ကြန္ပ်ဴတာမွာ ေဒါင္းျပီး Install ေပးလိုက္ပါေနာ္
ေနာက္ ကြန္ပ်ဴတာေပၚမွာ ဘဲ ဖြင့္လိုက္ပါ...
ေနာက္ ဖုန္းကို ခ်ိတ္ဆက္ေပးလိုက္ပါ ခဏေစာင့္ပါ Vroot မွာ ဖုန္းနဲ႕ကြန္ပ်ဴတာ ခ်ိတ္ဆက္မိျပီဆိုတာနဲ႕
ဖုန္းပုံေလး ေပၚေနပါလိမ့္မယ္  မေပၚပါက ကြန္ပ်ဴတာနဲ႕ ဖုန္း မသိေသးတဲ့အတြက္ ျဖစ္ပါလိမ့္မယ္..
အဲတြက္ ကြန္ပ်ဴတာမွာ Samsaung Driver ကိုေဒါင္းျပီး အင္စေတာေပးပါ အေပၚမွာေပးထားပါတယ္။
အိုေက ဖုန္းမွာလည္း usb debbugging ကို On ေပးထားျပီဆို သိလာပါလိမ့္မယ္..
ဒါဆို ဖုန္းပုံေလးေပၚတာနဲ႕ root စတင္ လိုက္ပါေနာ္... ခဏေလးဘဲ ၾကာပါတယ္..
ဖုန္းေအာ္တို restart ၾကျပန္တက္လာတာနဲ႕ မိမိတို႕ဖုန္းေပၚမွာ root access ျပထားပါမယ္...
အဲတာဆိုရပါျပီ... လိုအပ္တဲ့ အေပၚကျမန္မာစာအတြက္ ေဆာ့၀ဲလ္ေတြ ေဒါင္း ဖုန္း memory card မွာထည့္ျပီး install လုပ္ေပးလိုက္ပါ...
( 0R )
ကိုသုံးနိဳင္ပါတယ္... 

အဲတာကို ဖုန္းမွာ open ျပီး ျမန္မာစာ ခ်ိန္းေပးလိုက္တာနဲ႕ ရပါျပီ...

    ေနာက္ အဲနည္းမွမရခဲ့ပါက  Odin ကေန၀င္ root ၾကမယ္

အိုေက အေပၚမွာ ေဒါင္းဖို႕ေပးထားပါတယ္  Odin  နဲ႕ CF Auto root ကိုပါ..
cfautoroot  ဆိုတဲ့ zip ဖိုင္ေလးကို ေဒါင္းျပီး ကြန္ပ်ဴတာမွာ extract လုပ္ေပးလိုက္ပါ  ဖိုင္အ၀ါေလးတခုထြက္လာမယ္ အဲထဲကမွ   cf auto root ဖိုင္ေလးကို ဒက္စေတာ့ေပၚ ခဏထားလုိက္ပါ

 အိုေက ဒါဆို ေဒါင္းထားတဲ့ Odin ေလးနဲ႕ အသုံးျပဳျပမယ္ေနာ္...အိုေက စေတာ့မယ္ဆိုေတာ့ မိမိ တို႕ ဖုန္းကို ပါ၀ါပိတ္လုိက္ပါ Download Mode ကို၀င္မွာ ျဖစ္ပါတယ္
ဖုန္းကို Download Mode ထဲဝင္ဖို႕ရန္ Vol Down + Home + Power အဲ့ခုလုတ္ 3 ခုကုိႏွိပ္၍ စာတတ္လာေသာအခါ Vol Up ကို တစ္ခ်က္ႏွိပ္လိုက္ပါ Downloading...... ဆိုၿပီး ၿပေနပါၿပီ ဖုန္းကို PC မွာ ၾကိဳးခ်ိတ္လို္က္ပါ ။


 ကြန္ပ်ဴတာ ဖိုင္ကိုေရာက္မယ္ ေစာေစာက မိမိတို႕ ထားတဲ့ ဒက္စေတာ့ေပၚက CF Auto root ဖိုင္ေလးဆီကိ္ု သြားမယ္
ပုံထဲကတိုင္း ကလစ္ေပးလိုက္ပါ ဒါဆို အဲဖိုင္ေလး Odin ထဲကိုေရာက္မွာျဖစ္ပါတယ္
AP ထဲမွာ ဖိုင္ေလးေရာက္ျပီ ဆိုတာနဲ႕ ေအာက္က START  ဆိုတာကလ္စလုိက္ပါ
ခဏေစာင့္ေပးပါ အေပၚမွာ အစိမ္းတန္းေလးေျပးေနမယ္ ျပည့္တာနဲ႕ မိမိဖုန္း ပါ၀ါ RESTART ၾကမယ္ ျပန္တက္လာတာနဲ႕ အိုေကပါျပီ....
 ျမန္မာစာအတြက္ကေတာ့ အေပၚမွာ ေပးထားတဲ့ Fontchanger ( သို႕ ) MMAD Smart Zawgyi ကိုသုံးနိဳင္ပါတယ္..ေနာ္....
တျခားျမန္မာစာ မွန္တဲ့ နည္းလမ္းေတြ apk ေတြလည္းအသုံးျပဳနိဳင္ပါတယ္..
ဒါေလးကေတာ့ ကြ်န္ေတာ္ လက္ေတြ႕ စမ္းသတ္ ထားတဲ့ နည္းေလးျဖစ္တာမို႕ တင္ျပလိုက္တာပါ..
ျမန္မာစာ မမွန္ေသးပါက mm font installer ဆိုတာေလး အင္စေတာေပးလိုက္ပါ..
အဆင္ေျပပါေစ....

LinkWithin

Related Posts Plugin for WordPress, Blogger...

Share

Twitter Delicious Facebook Digg Stumbleupon Favorites More