မဂၤလာပါေမာင္ခိုင္ထူးဘေလာ့ကိုလာလည္ေသာမိတ္ေဆြအေပါင္းေပ်ာ္႐ႊင္ခ်မ္းေႁမ႔ၾကပါေစ

This is default featured post 1 title

Go to Blogger edit html and find these sentences.Now replace these sentences with your own descriptions.This theme is Bloggerized by Lasantha Bandara - Premiumbloggertemplates.com.

This is default featured post 2 title

Go to Blogger edit html and find these sentences.Now replace these sentences with your own descriptions.This theme is Bloggerized by Lasantha Bandara - Premiumbloggertemplates.com.

This is default featured post 3 title

Go to Blogger edit html and find these sentences.Now replace these sentences with your own descriptions.This theme is Bloggerized by Lasantha Bandara - Premiumbloggertemplates.com.

This is default featured post 4 title

Go to Blogger edit html and find these sentences.Now replace these sentences with your own descriptions.This theme is Bloggerized by Lasantha Bandara - Premiumbloggertemplates.com.

This is default featured post 5 title

Go to Blogger edit html and find these sentences.Now replace these sentences with your own descriptions.This theme is Bloggerized by Lasantha Bandara - Premiumbloggertemplates.com.

แสดงบทความที่มีป้ายกำกับ blogger แสดงบทความทั้งหมด

วันพุธที่ 1 ตุลาคม พ.ศ. 2557

Blogger တြင္ ZawGyi ႏွင္. Unicode Font မ်ားကို Embed လုပ္နည္း( ရွယ္နည္းေလးပါ)


မဂၤလာပါေနာ္  သည္ေန႕ ေရးျဖစ္တာေလးကေတာ့  ဖုန္းေတြမွာ ျမန္မာစာ မွရိေတာင္ ကြ်န္ေတာ္ 


တို႕ဘေလာ့မွာ ၀င္တာနဲ႕ ျမန္မာစာျမင္နိဳင္မယ့္ နည္းလမ္းေကာင္းေလးပါဘဲ.. သည္နည္းေလးကိုေတာ့ 


ပထမ ကုဒ္နမူနာျပသလမ္းညႊန္ေပးထားေသာ  ကို မိုးသၾကား  နဲ႕  ကိုျမင့္မင္းစိုး တို႕အား 


ေက်းဇူးတင္ရွိပါေၾကာင္း


Mobile အေတာ္မ်ားမ်ားတြင္ ၿမန္မာေဖာင္.သြင္းလို.ရေသာ္လည္း အခ်ိဳ.ဖုန္းမ်ား/Jailbreak မရေသးေသာ 


IOS User တို.အတြက္ မိမိ တို.၏ ဆိုဒ္ ကိုဝင္ေရာက္.ၾကည္.ရွုရန္ အခက္အခဲးေတြရပါလိမ္မည္။ဒီေန.


 ကြ်န္ေတာ္. ဆိုဒ္ ကို ၿပဳဳ.ၿပင္ရင္း  ဘေလာ့ကာ ညီအကို အခ်ိဳ.လုပ္ထားေသာနည္းလမ္းကို 


စမ္းၾကည့္လိုက္ရာ ေအာင္ၿမင္သြားသၿဖင္. မသိေသာေသာ ဘေလာ. ပိုင္ရွင္ေဘာ္ေဘာ္ တို.အတြက္ 


ၿပန္ရွယ္ေပးလိုက္ပါတယ္......ထည္.သြင္းလိုပါက ေအာက္မွာဆက္ဖတ္ေပးပါ ခင္ဗ်။


အသုံးျပဳရန္ ကုဒ္မ်ား


ၿမန္မာ Unicode Font ကို သြင္းခ်င္ပါက ေအာက္က Code ကိုသံုးပါ။


@font-face {
font-family:'MON3 Anonta 1';
src:local('MON3 Anonta 1'),url('http://mmwebfonts.comquas.com/fonts/mon3.ttf');
}
body,html,p,code,*,table,td,tr,span,div,a,ul,li,input,textarea{font-family:'MON3 Anonta 1'!important;}

မွတ္ခ်က္   ။          ။ ျမန္မာ ယူနီ ကုဒ္ထည့္သြင္းပါက  မိမိဘေလာ့မွာ စာလုံးေတြ 

ကေမာက္ကမ ျဖစ္ေနပါမည္...ျပင္ဆင္ဖို႕လိုပါမည္... ကြ်န္ေတာ္ကေတာ့ Zawgyi Font 

ကိုဘဲသြင္းပါသည္။
ၿမန္မာ Zawgyi Font ကို သြင္းခ်င္ပါက ေအာက္က Code ကိုသံုးပါ။
@font-face {
font-family:'Zawgyi-One';
src:local('Zawgyi-One'),url('http://mmwebfonts.comquas.com/fonts/zawgyi.ttf');
}
body,html,p,code,*,table,td,tr,span,div,a,ul,li,input,textarea{font-family:'Zawgyi-One'!important;}


Blogger တြင္မိမိတို.သြင္းလိုေသာ blog ၏ template ကို ႏွိပ္လိုက္ပါ။


မိမိတို႕ လုပ္လိုေသာ ဘေလာ့ရဲ႕  Template ကို၀င္လိုက္ပါေနာ္  ပု့ေလးေတြနဲ႕ တဆင့္ဆီ သြားျပပါ့မယ္..


ေရာက္တာနဲ႕ Customise  ဆိုတာေလးကိုကလစ္ေပးလိုက္ပါ..


အိုေက ဘယ္ဘက္တန္းထဲက Advance  ဆိုတာကိုဆက္ကလစ္ေပးလိုက္ပါ။


အိုေက scorrl ဘားေလးဆြဲခ်လိုက္ပါ ေအာက္ဆုံးက Add CSS  ဆိုတာကိုကလစ္ေပးပါ။


အထဲမယ္ ကုဒ္ဒင္းေတြေတြ႕နိဳင္ပါလိမ့္မယ္  အဲကုဒ္ေတြရဲ႕ ေအာက္ကေန အေပၚက ကူးလာေသာ

Union Code (သို႕) zawgyi one ကုဒ္ကို ထည့္ေပးနိဳင္ပါတယ္...

၂.. ခုစလုံးထည့္လိုပါက.. တစ္ခုကို ထည့္ျပီး တာနဲ႕ အေပၚညာေထာင့္က Apply to Blog  

ဆိုတာကလစ္ေဆ့ျပီး မွ  ေနာက္ တၾကိမ္  ပထမကုဒ္ထည့္သလို ျပန္၀င္ထည့္နိဳင္ပါတယ္ေနာ္....

ဘယ္ကုဒ္ကို ထည့္ထည့္  အေပၚက Apply   to  Blog  ဆိုတာေတာ့ ကလစ္ေပးရမွာျဖစ္ပါတယ္...

အိုေက  ဒါဆို ထည့္နည္းေတာ့ အဆင္ေျပေလာက္ပါျပီေနာ္...ေနာက္ တစ္ခုက်န္ပါေသးတယ္ေနာ္..

Mobile Theme ကို enable လုပ္ထားရင္ mobile မွာၿမင္ရလိမ္မည္မဟုတ္ပါ။


iPhone , iPad , Android (firefox) တို့တြင္ၿမင္လိုလွ်င္ mobile theme ကို disable လုပ္ထားပါ။


လုပ္နည္းကေတာ့


ဘေလာ့ကာ Template  ကိုကလစ္ျပီး  ညာဘက္မွာ ရွိတဲ့  Customise Mobile Template  ဆိုတာေလးကို  ကလ္စေပးရမွာ ျဖစ္ပါတယ္...


အိုေက အေပၚက ပုံေလးတုိင္း No. Show desktop template mobile device  ဆိုတာကို အမွတ္ေပးျပီး

Save ေပးလိုက္တာနဲ႕ မိမိတို႕ လုပ္ေဆာင္ခ်က္ ျပီးဆုံးခဲ့ပါျပီေနာ္

အဆင္ေျပၾကပါေစ

วันเสาร์ที่ 11 มกราคม พ.ศ. 2557

သင့္Blogက ပိုစ့္ေတြကို Facebook တြင္ Automatic ေရာက္ေအာင္လုပ္နည္း (Blogger only)

မဂၤလာပါ။ Tech in Blogging မွႀကိဳဆိုပါတယ္။ မေျပာျပခ်င္ေတာ့လည္းေျပာရေတာ့မယ့္အေနထားပါ။ ကြ်န္ေတာ္ကေတာ့ လူၿပိန္းနားလည္ေအာင္ႀကိဳးစားၿပီးရွင္းျပမယ္ဗ်ာ။ နားမလည္ရင္ စာေရးသူည့ံတာထက္ သင္တို႕ေသခ်ာမဖတ္ၾကလို႕ပါ။ မသိေသးသူမ်ားအတြက္ပါ။ winkabarkyaw.net ကေရးတာမရွင္းလို႕ဆိုလို႕ပါ။ ကြ်န္ေတာ္လည္း လူၿပိန္းပါပဲ။ ကြ်န္ေတာ္ networkedblogs ကိုမႏွစ္ကတည္းကသံုးေနတာပါ။ အလြန္အဆင္ေျပပါတယ္။


http://adf.ly/NUprJ ကို၀င္လိုက္ပါ။ မရရင္ {ဒီမွာကလစ္} ပါ။


ၿပီးတာနဲ႕ ကြ်န္ေတာ္၀ိုင္းထားတဲ့အတိုင္း Get Started Now ကို၀င္ပါဗ်ာ။
Facebook အေကာင့္ဖြင့္ထားရင္ေတာ့ ေနာက္တစ္ဆင့္သြားပါ။ မဖြင့္ရေသးရင္ ၀င္လုိက္ပါဗ်ာ။
Log in with Facebook ကိုကလစ္လိုက္ပါ။
Click here to continue  ကိုကလစ္လုိက္ပါ။
Register a Blog ကိုကလစ္ပါ။
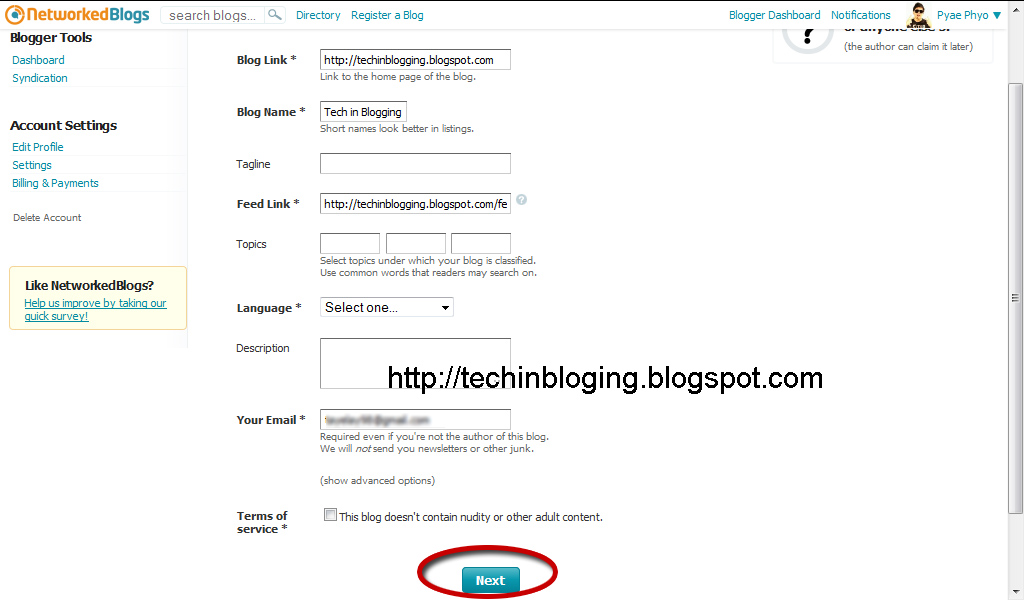
ကြ်န္ေတာ္အနီေရာင္နဲ႕၀ိုင္းထားတဲ့ေနရာမွာ သင့္ရဲ႕ Blogger link ကိုထည့္ပါ။( ဥပမာ - http://techinblogging.blogspot.com ) ၿပီးရင္ Next ကိုကလစ္ပါ။
အကုန္ျဖည့္ပါ။ Terms of service* ရဲ႕ညာဘက္က box ကိုအမွန္ျခစ္ေပးခဲ့ပါ။ Language* မွာ English လို႕ေပးပါ။ ၿပီးတာနဲ႕ Nextကိုကလစ္ပါ။
Yes ကိုကလစ္လိုက္ပါ။
ေမးလ္၀င္လာတာနဲ႕ အိုေခပါၿပီ။ ကဲ။ ဆက္ဖတ္ရေအာင္။
Blogger Dashboard ကိုကလစ္လုိက္ပါ။
Syndication ကိုကလစ္လိုက္ပါ။

Grant Permissons ကိုကလစ္ပါ။
New window အေနနဲ႕ ေပၚလာလိမ့္မယ္။ Allow ကိုကလစ္ပါဗ်ာ။
(1) Choose a blog to syndicate ရဲ႕ေအာက္မွာ သင့္ရဲ႕ Blog နာမည္ကိုရွာၿပီးထည့္လုိက္ပါ။ ကြ်န္ေတာ့္ ဘေလာ့နာမည္က Tech in Blogging ပါ ဒါေၾကာင့္ အဲ့ဒါပဲေရြးလိုက္ပါတယ္။

Add Facebook Target ကိုကလစ္ပါဗ်ာ။
ကြ်န္ေတာ္ကေတာ့ Pyae Phyo ဆိုတဲ့ page မွာပဲ Add လိုက္ပါတယ္ဗ်ာ။ ၿပီးရင္ Already added ျပၿပီးရင္ ေအာင္ျမင္ၿပီးဆံုးသြားပါၿပီ။ ကြ်န္ေတာ့္လိုနလပိန္းတံုးမ်ား နားလည္ေစေအာင္လို႕တင္ေပးတာပါ။

LinkWithin

Related Posts Plugin for WordPress, Blogger...

Share

Twitter Delicious Facebook Digg Stumbleupon Favorites More