မဂၤလာပါေမာင္ခိုင္ထူးဘေလာ့ကိုလာလည္ေသာမိတ္ေဆြအေပါင္းေပ်ာ္႐ႊင္ခ်မ္းေႁမ႔ၾကပါေစ

This is default featured post 1 title

Go to Blogger edit html and find these sentences.Now replace these sentences with your own descriptions.This theme is Bloggerized by Lasantha Bandara - Premiumbloggertemplates.com.

This is default featured post 2 title

Go to Blogger edit html and find these sentences.Now replace these sentences with your own descriptions.This theme is Bloggerized by Lasantha Bandara - Premiumbloggertemplates.com.

This is default featured post 3 title

Go to Blogger edit html and find these sentences.Now replace these sentences with your own descriptions.This theme is Bloggerized by Lasantha Bandara - Premiumbloggertemplates.com.

This is default featured post 4 title

Go to Blogger edit html and find these sentences.Now replace these sentences with your own descriptions.This theme is Bloggerized by Lasantha Bandara - Premiumbloggertemplates.com.

This is default featured post 5 title

Go to Blogger edit html and find these sentences.Now replace these sentences with your own descriptions.This theme is Bloggerized by Lasantha Bandara - Premiumbloggertemplates.com.

วันจันทร์ที่ 12 สิงหาคม พ.ศ. 2556

Window 7 သမားေတြအတြက္ Format ခ် Window အသစ္တင္နည္းစာအုပ္


Virus ရွိလို ့ တစ္ခုခုေၾကာင့္ဆိုရင္ Hardisk ကို Format ခ်ပီးမွ ျပန္တင္သင့္တယ္

Partation လည္း ဖ်က္လိုက္ ၀င္းဒိုးတင္ပီးမွ ျပန္ခြဲလို ့ရတယ္ ။ ေကာင္းေနတဲ့စက္

မွာဆို  အေခြထဲ့တာနဲ ့Auto PLay မပိတ္ထားရင္ Install ေပၚတယ္ ။ပိတ္ထားရင္

DVD ROOM ထဲကေန ၀င္လုပ္လည္းရတယ္ ။ အကယ္၍ Format ခ်မယ္ဆိုခဲ့ရင္

Setup ကေနလုပ္မွရမယ္ ။ တင္တာကမခက္ပါဘူး။  စာအုပ္ဖတ္ပီးလိုက္လုပ္မယ္

ေလ့လာမယ္ဆို  ခဏေလးနဲ ့တတ္တယ္ ။ ၀င္းဒိုးတင္တတ္ပီဆို  ကြန္ပ်ဳတာပ်က္

ေလ့လံေႏွးေကြးလာပီဆို ကိုယ့္ဟာကို  အေခြနဲ ့ျပန္တင္လိုက္ ။ ပိုက္ဆံမကုန္ဘူး

ေဆာ့၀ဲေတြက လိုင္းေကာင္းရင္ အကုန္ျပန္ရႏိုင္တယ္။ Driver လည္းေပါပါတယ္

စက္၀ယ္ေတာ့ Driver အေခြထည့္ေပးတတ္တယ္ ။ အဲ့အေခြေလးေသခ်ာသိမ္းပါ

မဟုတ္ရင္  Package တစ္ခုလံုး ျပန္ျပီး  Download ယူရတာ အခ်ိန္ကုန္ပါသည္

၀င္းဒိုးတင္တတ္ခ်င္သူမ်ား စာအုပ္ဖတ္ျပီးလက္တည့္စမ္းခ်င္ရင္ ဆြဲထားလိုက္...။


ဒီလင့္မွာ Download ယူပါ =www.mediafire.com-၀င္ဒိုးတင္နည္းစာအုပ္

android ဖုန္းေတြအတြက္ wifi

android ဖုန္းေတြအတြက္ wifi နွင္ ့ပက္သက္သမ်ွစုစည္းမွဴေလးပါ။လိုအပ္ရင္ေအာက္မွာယူေပးလိုက္ၾကပါ။
လိုင္းမေကာင္းတဲ ့ေနရာေဒသမွသူငယ္ခ်င္းမ်ားအားလံုးအဆင္ေျပၾကပါေစခင္ဗ်ား။
ဒီေကာင္ေလးကေတာ ့ဝိုင္ဖိုင္ကို အျမန္ဆံုးရေအာင္ကူညီေပးမယ္ ့ေကာင္ေလးပါ။get wifi faster ကိုလိုခ်င္တယ္ဆိုရင္ေတာ ့ 

 Cover art
ဒီေကာင္ေလးကလည္း ANDROID အတြက္WIFI ကို3G WIFI BOOSTER ေလးပါ
လိုခ်င္ရင္ေအာက္မွာ

Cover art
ဒီေကာင္ေလးကလည္း WIFI STRATER ေလးပါ။ YOUTUBE ေတြၾကည္ ့တဲ ့အထိေတာင္
ေကာင္းေကာင္းျမန္နွဳန္းျမင္ ့ေအာင္ျမွင္ ့ေပးနိုင္လို ့လိုခ်င္ရင္

Cover art 
FREE WIFI ေလးက အနီးအနားမွာရိွတဲ ့WIFI ေတြကို WEP, WAP, WAP2. အထိေတာင္
ဟက္ေပးနိုင္တယ္လို ့ေျပာထားပါတယ္လိုခ်င္ရင္ေတာ ့

Cover art 
ANDROID နွင္ ့ PC နွင္ ့အၾကားမွာ WIFI စနစ္သံုးDATA ေတြကိုအျပန္အလွန္
ရွယ္ေပးမဲ ့ေကာင္ေလးပါလိုခ်င္ရင္ေတာ ့
credit by http://www.winkabarkyaw.net/ 

วันอาทิตย์ที่ 11 สิงหาคม พ.ศ. 2556

DriverPack Solution 13 R375 (Supports all brands and types of Computers)


 DriverPack ကို သိတဲ႔ လူေတြ သိၾကမွာပါ... ဝင္းဒိုးတင္ျပီး မစံုမလင္ျဖစ္ေနတဲ႔ Driver ေတြကို အလိုေလွ်ာက္ ထည့္သြင္းေပးႏိုင္ပါတယ္ Window 8 ထိ Support လုပ္ႏိုင္ပါတယ္... (တဆင့္ျပန္လည္မွ်ေဝျခင္းသာ)


Introduction: DriverPack Solution 13 R375
DriverPack Solution 13 R375 Latest Single Link DVD Version Free Download is a collection of various types of drivers that can be used to download the scans,  and the latest drivers installed on your computer be it a PC, laptop, or Netbook. DriverPack Solution 13 smart choice for computer technicians and home users, with only 13 R375 Final DriverPack Solution you can update and install various types and brands of computers easily, quickly, and without needing an internet connection to run.

Features:
  • Support Windows XP, Vista, 7, 8 (32-bit and 64-bit)
  • Install process is very fast
  • Automatically detects the need to install drivers or update to the latest version
  • Display that is easy to understand
  • Easy to operate
  • Supports all brands and types of computers (PC, Notebook / Laptop, and Netbook)
Download Links: 
Password : daoud

 Thank : http://www.daoudsoftwares.com

အခ်ိန္ကုန္သက္သာေစဖို႔ IDEVICES ေတြကိုiMobie AnyTrans သံုးၿပီးေျပာင္းမယ္

iMobie AnyTrans 3.4.9 Build 20130703 | 12.80 MB
ဒါေလးကေတာ့ မိမိရဲ႕ ကြန္ျပဴတာကေန Apple Devices ေတြကို သီခ်င္းထည့္ျခင္း
video ေတြ ကို ITUNE လို ထည့္ႏိူင္ပါတယ္ 
ေပ်ာက္ပ်က္မွာေၾကာက္လို႔ BACK UP လုပ္ထားခ်င္တယ္ ဆိုရင္လည္း 
အမ်ားႀကီးကူညီေပးႏိူင္ပါတယ္

Apple devices ေတြ ဆိုရင္ iPhone 5, iPad mini, iPod touch 5 ထိ အသံုးျပဳ႕လို႔ရပါတယ္
သီခ်င္းေတြ အျပင္ Game ေတြ Application ေတြ ကိုလည္း ထုတ္ႏိူင္သြင္းႏိူင္
လိုသလို စီမံ ႏိူင္ပါတယ္ တကယ္လို႔ေျပာင္းေရြ႕ခ်ငတယ္ဆိုရင္လည္း 
ျမန္ႏႈန္း speed ေကာင္းေကာင္းေလးနဲ႔ ေျပာင္းေရြ႕ႏိူင္ပါတယ္
သူက ITUNE ထဲ ကိုလည္း သြင္းေပးႏိူင္သလို Devices ေတြ ဆီ ကိုလည္း တိုက္ရိုက္
အသြင္းအထုတ္လုပ္ေပးႏိူင္ပါတယ္ lincence အတြက္ကေတာ့ စိတ္မပူရေအာင္လို႔
ဖတ္ပါဆိုတဲ့ဖိုင္ထဲမွာတခါတည္း ထည့္ေပးထားပါတယ္ ခင္ဗ်ာ
အသံုးလိုမယ္ဆိုရင္ ေအာက္မွာတခါတည္းေဒါင္းသြားလိုက္ပါ
လာေရာက္လည္ပတ္တဲ့ ညီအကို မ်ား အခ်ိန္မကုန္ေအာင္ Adf.ly လင္ မခံထားပါ
ALEX

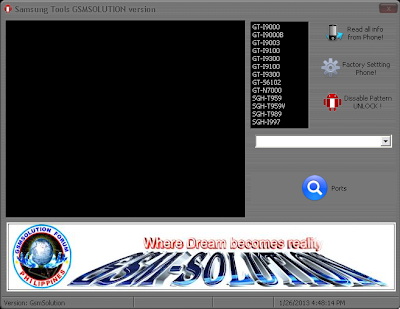
Samsung Tool For Pattren Unlock & Factory Setting Phone

samsolution.exe, Samsung tool
 ဆမ္ေဆာင္းဖုန္းေတြ Pattern lock က်ေနရင္ၿဖစ္ၿဖစ္၊Factory Setting ၿပင္ခ်င္တာၿဖစ္ၿဖစ္အသံုး၀င္မယ္ Tool ေလးပါ။

1. ဖုန္းကို USB ၾကိဳးနဲ႔ ကြန္ပ်ဳတာနဲ႔ ခ်ိတ္ဆက္ထားလိုက္ပါ။
2. ေဒါင္းလုပ္လုပ္ထားတဲ့ Samsolution.exe ကိုဖြင့္လိုက္ပါ။
 3. Ports ဆိုတဲ့ မွန္ဘီလူးပံုေလးနဲ႔ ေကာင္ေလးကိုနိပ္လိုက္ပါ။
4. ဖုန္းရဲ့ COM port ကို Drop down List ကေနေရြးလိုက္ပါ။
(if don't know, Find your Device's serial COM port from Device Manager = (Right click My Computer -> Manage -> Device Manager -> Ports (COM & LPT).
5.  Read all info from Phone! ကိုကလစ္ေပးလိုက္ပါ။
6. Click Disable Pattern UNLOCK! ( Now Just Disabled Pattern Lock ! if you want to backup your Phone Data Do it Manually)
7. Click Factory Setting Phone


Share By Taikkyi Thar


မိမိတို႕ႏွစ္သက္ေသာ ဘေလာ့ဆိုဒ္မ်ားအား Android ဖုန္းမ်ားတြင္ Online/Off line ၾကည့္နိဳင္ရန္ APK လုပ္ယူနည္း

ကၽြန္ေတာ္အခုတင္ေပးမွာကေတာ့ ကၽြန္ေတာ့္လို အခုမွစၿပီး blog အေၾကာင္းကိုေလ့လာေနတဲ့ ညီအစ္ကိုေတြအတြက္ရည္ရြယ္ၿပီး ဘေလာ့ခရီးသည္ ကၽြန္ေတာ့္ အစ္ကိုၾကီးေအာင္ေအာင္(မကစ)ဆီကေန ေလ့လာထားတာေလးျပန္ၿပီး ကူယူမွ်ေ၀ေပးလိုက္ရပါတယ္ဗ်ာ။
 မဂၤလာပါေနာ္... အခု တင္မည့္နည္းလမ္းေလးကေတာ့  ဘေလာ့ကာ မ်ားစြာကို  ဘေလာ့ေပါင္းမ်ားစြာကို
မိမိတို႕ ဖုန္းကေန   online/ off line  ကေနအဆင္ေျပစြာ ဖတ္ရွဳနိဳင္ဖို႕   apk  လုပ္နည္းေလးကို မွ်ေ၀မွာ ျဖစ္ပါတယ္.... နည္းလမ္းေလးကေတာ့ ေတာ္ေတာ္မ်ားမ်ား  သိေနၾကျပီးျဖစ္ျခင္ျဖစ္ေနမွာပါ
ဒါေပမယ့္  မသိေသးေသာ မိတ္ေဆြမ်ားအတြက္  ရည္ရြယ္ျပီးးး  ျပန္လည ္မွ်ေ၀ျခင္းျဖစ္ပါတယ္....
ကဲစၾကမယ္ေနာ္  အဆင့္ေလးေတြအလိုက္ ပုံေလးေတြနဲ႕ ေသေသျခာျခာ ရွင္းျပပါ့မယ္.....
 ပထမဆုံး   မိမိတို႕ လုပ္လိုေသာ ဆိုဒ္ကို ဖြင့္လိုက္ပါ..... ဥပမာ က်ေနာ္ ဆိုဒ္တစ္ခုနဲ႕ နမူနာထား ျပသြားပါ့မယ္....ေနာ္
 http://www.herostown.blogspot.com  ကိုဖြင့္လုိက္ပါျပီ.....

ခုလိုေလးေပၚလာျပီဆိုတာနဲ႕ အေပၚတူးဘားက  မိမိတို႕ ဘေလာ့လိပ္စာေရွ႕က logo  ေလးိကုကလစ္ပါ..
ကလစ္လို႕ က်လာတဲ့ ေဘာက္ေလးရဲ႕   More Information  ဆိုတာကိုကလစ္လိုက္ပါ။


 သည္လိုေလးက်လာမယ္.... အဲခါမွာ  အေပၚက  Feed ဆိုတာကိုကလစ္ပါ... အဲခါမွာဘဲ.. Atom နဲ႕ RSS
လင့္ေတြ ်ကလာမွာျဖစ္ပါတယ္... လင့္တခုကို ေစျခာ မွတ္သားျပီး  ေကာ္ပီယူသိမ္းထားေပးလုိက္ပါ...
ေကာ္ပီယူရတာ ခက္ခဲပါက  လင့္ေနာက္မွာ ေမာက္ေထာက္ စခရစ္ေပၚလာမယ္ ကလစ္ေပးလိုက္ပါ
စာမ်က္ႏွာသစ္နဲ႕က်လာတာနဲ႕  အေပၚတူးဘားက လင့္ကို ေကာ္ပီယူ အတူတူပါဘဲဗ်ာ.......
ကဲ...လုပ္ေဆာင္ခ်က္  စေတာ့မယ္..ေနာ္

                                 သည္ မွာ    ကလစ္ျပီး သြားလုိက္ပါေနာ္...

အမွတ္စဥ္  (၁)  ။             ။  ေအာက္ကပုံအတိုင္း   sing up  လုပ္ေပးလိုက္ပါ....


အမွတ္စဥ္  (၂)    ။      ။  ကေတာ့ ေအာက္ကအတိုင္းလိုအပ္သလိုျဖည့္စြပ္ျပီး  sing up လုပ္ရမွာေနာ္


အမွတ္စဥ္  (၃)  ။           ။ အေနနဲ႕ကေတာ့ AppYetV2  ဆိုတာကိုကလစ္လိုက္ပါ။အဲမွာ လိုအပ္တဲ့
                                  အမည္ေတြ....ျဖည့္ေပးရပါမယ္.... သည္မွာ  RSS/Atom/Feed(s)  ဆိုတဲ့ေနရာမွာပါ    ေစာေစာကအေပၚဆုံးက ေကာ္ပီယူ သိမ္းထားတဲ့ လင့္ကို  ထည့္ေပးရမွာျဖစ္ပါတယ္။


အမွတ္စဥ္  (၄)  ။           ။  အေနနဲ႕ကေတာ့...အေပၚက  General  ဆိုတာကေန သြားးမွာပါ....
                                      အေပးဆုံးးက  မိမိဘေလာ့ဆိုဒ္အမည္ ၾကိဳက္တာေရးပါ  ဥပမာ။   ။ ဘေလာ့ခရီးသည္......လယ္တီေျမသား   ေပါ့ေနာ္...အဲေအာက္နားမွာ ေတာ့  Change  Icon  ဆိုတာကိုေတြ႕မွာပါ  စိတ္ၾကိဳက္  အိုင္ကြန္ေလးဖန္တီးျပီး  ထည့္နိဳင္ပါတယ္... အိုင္ကြန္ကိုေတာ့ ဆိုဒ္နဲ႕ ကိုက္ညီေအာင္  ေသးေသးဘဲ လုပ္ရမွာပါ....


အမွတ္စဥ္  (၅)   ။                     ။  သည္အဆင့္မွာေတာ့...အေပၚက Tabs ဆိုတာကိုကလစ္ထားပါ...
                                               သတိျပဳရမွာက Web ေရွ႕မွာ အမွန္ျခစ္ေပးဖို႕ပါ... ေအာက္မွာေတာ့
                                               မိမိဆိုဒ္လိပ္စာထည့္ရမယ္...... ျပီးတာနဲ႕ save change ေပါ့...။


အမွတ္စဥ္  (၆)  ။                ။  ကေတာ့...အေပၚဘားးက   Setting  ကိုကလစ္ပါ...ေအာက္မွာ....
                                         ေမးအေကာင့္.....ဆိုဒ္လိပ္စာ...ျပီးေတာ့  save  change  ေပါ့...။


အမွတ္စဥ္  (၇)    ။                 ။  ကေတာ့ေနာက္ဆုံးးအဆင့္ေပါ့... အေပၚဘားက  Build ကိုကလစ္ပါ။
                                            အဲမွာေတာ့   save change  ကလစ္လိုက္ ျပီးပါျပီ.....ေနာ္...


 ကဲ..မိမိတို႕  လုပ္ထားတဲ့   app..apk  ေလးကို မိမိတို႕ ေမးထဲမွာ သြားးေဒါင္းရမွာ ျဖစ္ပါတယ္....ေနာ္
မိမိတို႕  အေပၚကလုပ္ထားတဲ့အီးေမးိကု ၀င္လုိက္ပါ.....


အေပၚကပုံလို ေမးးထဲမွာ AppYet(2)  ကေန စာတစ္ေဆာင္ေရာက္ေနတာ ေတြ႕ရမယ္... ဖြင့္လိုက္ပါ...အဲမွာ ဘဲ ေဆာ့၀ဲလ္  ရွိေနပါျပီ... ေဒါင္းးယူယုံပါဘဲေနာ္...

ကဲ ရပါျပီဗ်ာ   ေဒါင္းေလာ့  ဖိုင္ေလး ႏွစ္ခုေတြ႕ရမယ္... အဲတာက  မူရင္း သူ႕ဆိုဒ္က အိုင္ကြန္ေလးနဲ႕  တစ္ခု  မိတ္ေဆြ တို႕ စိတ္ၾကိဳက္ အေပၚမွာ  အမွတ္စဥ္  (၄)  ကလုပ္ယူထည့္ခဲ့တဲ့ အိုင္ကြန္ေလးနဲ႕  တခုပါ

အဆင္ေျပပါေစ..

ေမာင္ေပါက္< Knowledge Note >
www.maungpauk.org

Download Here !

Memory Stick ရဲ႕ ပမာဏကို 1GB, 2G ကေန 4 GB ထိ ျမွင့္ေပးတဲ့ Memory-Stick Size Increaser


Memory-Stick Size Increaser ဟာ Memory Stick ရဲ႕ ပမာဏကို 1GB, 2G ကေန 4 GB ထိ ျမွင့္ေပးတယ္လို႔ဆိုပါတယ္.. မိတ္ေဆြမ်ား စမ္းသပ္ဖို႔ တင္ေပးလိုက္တာပါ.. Drive Increaser 2.bat ကို Run ေပးရမွာျဖစ္ပါတယ္..


အဆင္ေျပပါေစ..

ေမာင္ေပါက္< Knowledge Note >
www.maungpauk.org

LinkWithin

Related Posts Plugin for WordPress, Blogger...

Share

Twitter Delicious Facebook Digg Stumbleupon Favorites More