


 အာမၢးဒးစိုပ္ ေကတ္မၢးဒးဂြံ ေကၜာန္မၢးဒးဒွ္ဍာံ


Sari Poage Zenfone4 (T001)4.4.2ေဖါက္နည္းေလး႐ွိရင္ မ,စ ပါအံုးအကိုေရ.....
Zenfone 4 Kitkat ကေတာ့ Root ဖါက္မယ္ဆိုရင္ ကြန္ပ်ဴတာနဲ႔မွ အဆင္ေျပမွာပါ...
ေအာက္ပါအဆင့္အတိုင္း ျပဳလုပ္ေပးႏိုင္ပါတယ္...
1. Install USB driver Asus Zenfone 4 Your PC/Laptop.
Driver ကို အရင္ Install လုပ္ထားပါ....
USB Debugging ကို ON ထားဖို႔ လိုအပ္ပါမယ္...
ေအာက္ပါအဆင့္အတိုင္း USB Debugging ကို ON ေပးထားရပါမယ္...
Step 7: Select USB debugging and click OK.
ဖုန္းကို Power ပိတ္လိုက္ပါ...
(Power + Vol +) ကို တျပိဳင္ထဲ ႏွိပ္ျပီး Fastboot mode ကို ဝင္ပါ..
ဖုန္းကို PC နဲ႔ ခ်ိတ္ဆက္ပါ...
2. Download : file (Root_V2_Zenfone 4_T001.zip)
အေပၚက Root Zip ဖိုင္လ္ကိုေဒါင္းျပီး ျဖည္လိုက္ပါ...
အထဲမွာ OPEN.CMD ဆိုတဲ့ .bat ဖိုင္လ္ေလးကို Run လိုက္ပါ...
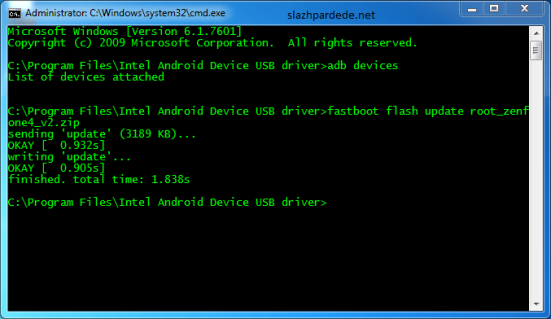
CMD Prompt ထဲကို ေအာက္ပါ အနီေရာင္နဲ႔ Command ကို Copy ကူးျပီး Enter ေခါက္ေပးလိုက္ပါ..
fastboot flash update root_zenfone4_v4.2.0.zip
သူ႕ဘာသာသူ အလုပ္ လုပ္ေနပါလိမ့္မယ္
ျပီးတာနဲ႔ ဖုန္းျပန္ပြင့္လာပါမယ္...
USB Debugging ကို ON ထားဖို႔ လိုအပ္ပါမယ္...
ေအာက္ပါအဆင့္အတိုင္း USB Debugging ကို ON ေပးထားရပါမယ္...
Step 1: Go to Settings.
Step 2: Click About.
Step 3: Open Software information.
Step 4: Tap Build number continuously until a pop-up hint informs you that you’ve entered the developer mode.
( Build number) ကို ၅ ၾကိမ္မွ ၇ ၾကမ္ေလာက္ ဆက္တိုက္ တို႔ထိေပးပါ)
Step 5: Return to Settings.
Step 6: Find and open Developer options.
ဖုန္းကို Power ပိတ္လိုက္ပါ...
(Power + Vol +) ကို တျပိဳင္ထဲ ႏွိပ္ျပီး Fastboot mode ကို ဝင္ပါ..
ဖုန္းကို PC နဲ႔ ခ်ိတ္ဆက္ပါ...
2. Download : file (Root_V2_Zenfone 4_T001.zip)
အေပၚက Root Zip ဖိုင္လ္ကိုေဒါင္းျပီး ျဖည္လိုက္ပါ...
အထဲမွာ OPEN.CMD ဆိုတဲ့ .bat ဖိုင္လ္ေလးကို Run လိုက္ပါ...
CMD Prompt ထဲကို ေအာက္ပါ အနီေရာင္နဲ႔ Command ကို Copy ကူးျပီး Enter ေခါက္ေပးလိုက္ပါ..
fastboot flash update root_zenfone4_v4.2.0.zip
သူ႕ဘာသာသူ အလုပ္ လုပ္ေနပါလိမ့္မယ္
ျပီးတာနဲ႔ ဖုန္းျပန္ပြင့္လာပါမယ္...
ျမန္မာစာအတြက္ကေတာ့ MM Aio Font Changer ေလးနဲ႔ ထည့္ေပးလိုက္ပါ..။
အဆင္ေျပပါေစ...
www.winkabarkyaw.net


 Time in Bangkok
  Yangon (Rangoon)


+001.png)


0 ความคิดเห็น:
แสดงความคิดเห็น